May 23, 2025
Blog PostSetting Up a Local Wiki: Step-by-Step Guide

If you are considering adopting the MediaWiki software, you may want to experiment with a local wiki before making the final decision. Here, we walk you through how to create a wiki on your own computer running the latest stable version of MediaWiki, 1.39, for you to play around with.
Prerequisites
A few separate tools will be used as part of setting up MediaWiki. Other than a file editor and an internet connection, you will need:
- A terminal that supports git commands. See instructions here for further details.
- Docker, a tool for managing software packages. On Windows or macOS, Docker Desktop is recommended. On new installations, the
composefeature is enabled by default – on existing installations rundocker compose versionto confirm availability – if it is not available, then install it. On Linux, MediaWiki developers suggest using just the Docker Engine and installing the packagesdocker-ce, docker-ce-cli, containerd.io, anddocker-compose-pluginmanually.
MediaWiki Installation Video Tutorial
The video featured above is Part 1 of a three-part tutorial series and is seamlessly integrated with this blog's content.
- Installing MediaWiki like a Pro
- Adding MediaWiki extensions the right way
- Customizing your MediaWiki installation
MediaWiki Core Installation
We start with getting the most basic "core" wiki up and running. The MediaWiki software is designed with support for "extensions" that are used to expand functionality and provide new features. Some of these extensions come bundled with the core software and just need to be enabled, while others are downloaded separately. We discuss enabling extensions later, but for now, we just want a bare-bones wiki.
This guide assume that all your wiki-related work is in a folder called docker (referred to as ../docker because the location of that folder should not matter). You can choose a different name for your folder, just alter the commands accordingly.
The first step is to make a local copy of the MediaWiki code. In your ../docker folder, run the following commands:
git clone https://gerrit.wikimedia.org/r/mediawiki/core.git mediawiki
cd mediawiki
git checkout tags/1.39.2 -b 1.39.2
git submodule update --init --recursive
At this point, the code for MediaWiki is downloaded, the specific version we are using (1.39.2) is "checked out", or made active, in the git repository, and the wiki is ready to be created.
Create the file ../docker/mediawiki/.env with the following content, to provide configuration to the initial setup:
MW_SCRIPT_PATH=/w
MW_SERVER=http://localhost:8080
MW_DOCKER_PORT=8080
MEDIAWIKI_USER=Admin
MEDIAWIKI_PASSWORD=dockerpass
XDEBUG_CONFIG=
XDEBUG_ENABLE=true
XHPROF_ENABLE=true
Next, start the wiki’s docker image. In your ../docker/mediawiki directory, run:
docker compose up -d
At this point, the page https://localhost:8080/ should indicate that MediaWiki is running, but it has not been set up yet.
For setting up MediaWiki, employ the command below. (Note for Windows users: This command is incompatible with Git for Windows; instead, utilize Windows PowerShell exclusively for this command.)
docker compose exec mediawiki /bin/bash /docker/install.sh
The following command is not always needed and is used to fix the permissions of the database files after their initial creation. Whether it is needed is based on the specific operating system you are running and the default file permissions it has, but there is no harm in always running it. In your preferred terminal, run the command:
docker compose exec mediawiki chmod -R o+rwx cache/sqlite
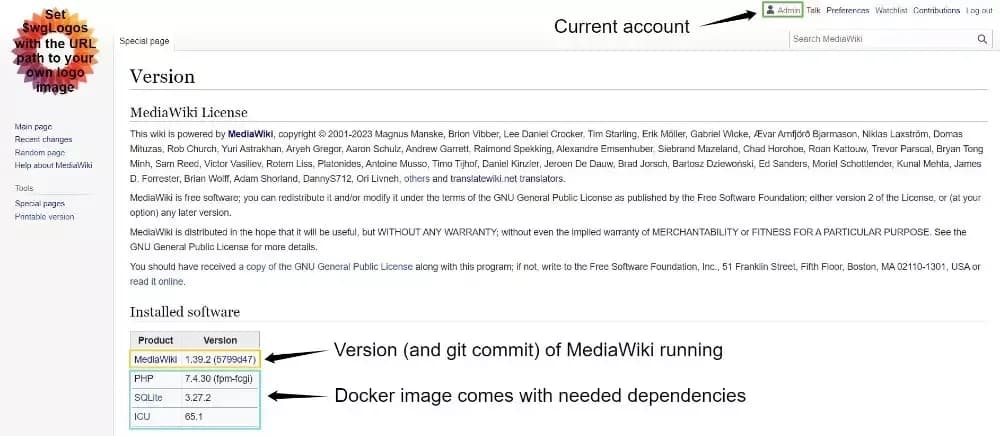
And the wiki has been created! You can log in with username "Admin" and password "dockerpass" and test it out. Visit http://localhost:8080/wiki/Special:Version to confirm the version of MediaWiki running, you should have something like:
MediaWiki Extensions
"Extensions" are used by MediaWiki to extend the available functionality. The software is specifically designed to be extended, and in prior blog posts, we have discussed the different types of MediaWiki extensions and what we at WikiTeq consider to be the best extensions. But how are extensions installed?
There are essentially only 4 steps to add a new extension to your wiki:
- Download the extension code to the appropriate folder
(../docker/mediawiki/extensions/ExtensionName) - Add
wfLoadExtension( 'ExtensionName' );to your configuration inLocalSettings.php(located in the../docker/mediawiki/directory) - (optionally) update composer dependencies, for extensions that have them.
- (optionally) run the update script, for extensions that have database changes.
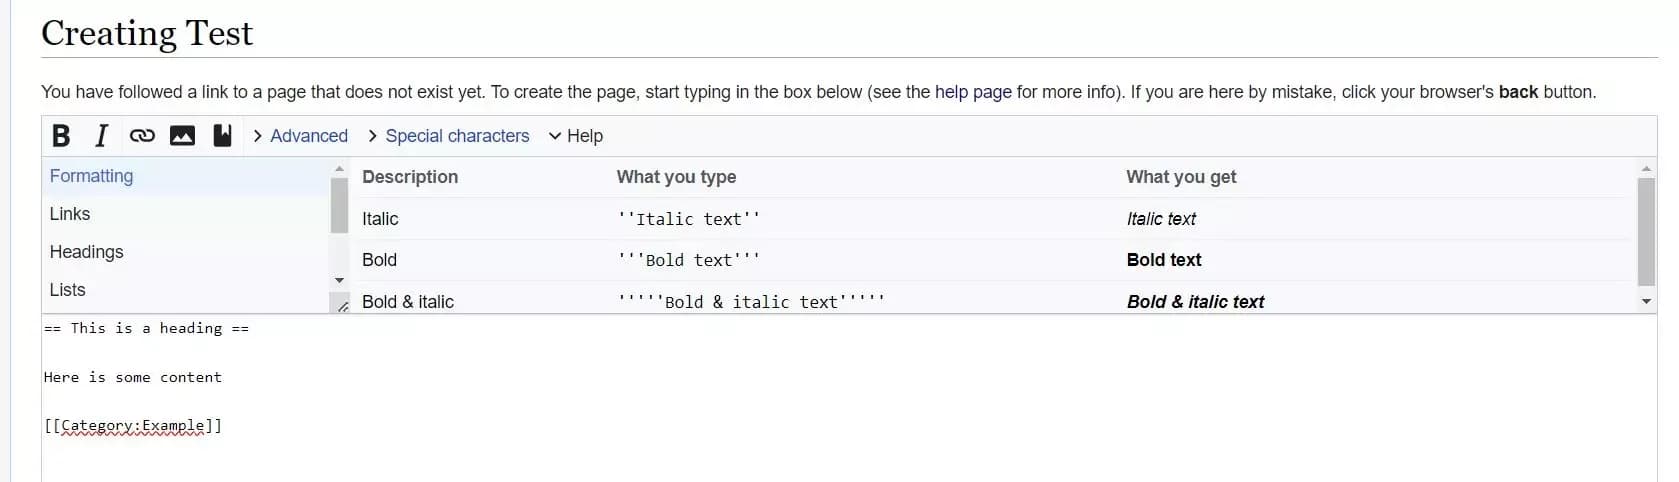
The simplest case is for extensions that come bundled with the MediaWiki software, meaning that you already have them downloaded when you downloaded the core code! All you need to do is enable them. One such extension is WikiEditor, which changes the editing interface.
Without it, if you go to create an article (e.g., http://localhost:8080/wiki/Test?action=edit), the interface appears as:

To enable the extension, add the following to LocalSettings.php:
wfLoadExtension( 'WikiEditor' );
After saving the file, if you reload Special:Version a new section will have appeared – extensions! It should list the newly enabled WikiEditor extension:

and, if you reload your editing window, the top of the textbox now has the toolbar, which shows how to format different wikitext features and has shortcuts for common actions:
Extensions are slightly more complicated to enable if they are not bundled (and thus need to be downloaded separately), have composer dependencies, or have database changes. The CheckUser extension, for example, meets all 3 of these conditions, so it makes a great example of how to install such extensions. For extensions that are bundled, have no composer dependencies, or lack database changes, just skip the corresponding step.
MediaWiki Extensions - Downloading with Git
The CheckUser extension is hosted on Gerrit, which is where most MediaWiki development occurs; for extensions on GitHub or another platform, just change the URL that the code is cloned from.
Beginning from your ../docker/mediawiki/ directory, run the following:
cd extensions
git clone https://gerrit.wikimedia.org/r/mediawiki/extensions/CheckUser
cd CheckUser
git checkout --track origin/REL1_39
The last line ensures that your local wiki uses the 1.39 version of the extension, instead of the latest version. Sometimes the latest version of an extension is incompatible with older version of MediaWiki, but the version of an extension for a specific release should always be compatible with that release.
Next, enable the extension as before, by adding the following to LocalSettings.php:
wfLoadExtension( 'CheckUser' );
MediaWiki Extensions - Composer Dependencies
While composer dependencies can be managed individually for each extension that has them, the preferred method is using the composer-merge-plugin utility created by MediaWiki developers specifically for this purpose.
If the file does not already exist, create in your main ../docker/mediawiki/ directory a file named composer.local.json as follows:
{
    "extra": {
        "merge-plugin": {
            "include": [
                "extensions/CheckUser/composer.json"
            ]
         }
     }
 }
If this file already exists, update it to add the CheckUser extension to the included paths. Then, to install the needed composer dependencies, run:
docker compose exec mediawiki composer update --no-dev
This will update all composer dependencies used by MediaWiki, including those needed by extensions that are registered in composer.local.json.
MediaWiki Extensions - Database Dependencies
Finally, for extensions that require database updates, the update.php maintenance script needs to be run. This will create any new tables that the extension uses, and is run with:
docker compose exec mediawiki php maintenance/update.php
And that’s it! The extension is now registered and working, and Special:Version should list it. Note that before executing the composer updates and running the maintenance script, it may already be listed on Special:Version and appear to work, but there will likely be bugs due to the missing database changes or library dependencies.
Extensions - Downloading with ExtensionDistributor
For extensions that are not bundled with MediaWiki, there is another way to download them, using the ExtensionDistributor extension on MediaWiki.org. The extension is specifically designed to export snapshots of extensions as a tar bundle that can be downloaded, from which the files can then be extracted.
Note that the ExtensionDistributor as installed on MediaWiki.org can only be used for extensions that are hosted on gerrit.wikimedia.org, and not on GitHub or other locations. Additionally, by installing extensions with the ExtensionDistributor, it makes them a bit harder to upgrade – instead of being able to just "pull" the latest changes from git, you will need to manually download the latest version.
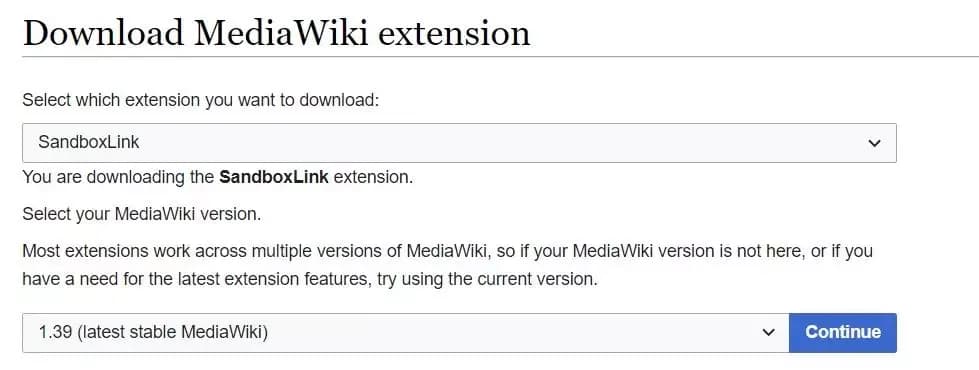
To access the ExtensionDistributor, visit https://www.mediawiki.org/wiki/Special:ExtensionDistributor and choose the extension you want to download. For example, the SandboxLink extension, which adds a link to a user’s "sandbox" page (for testing wiki edits) to the user toolbar.
To download, first select the desired extension, then the version (in this case 1.39). This should result in a form that looks like:
Once you hit "continue", the bundle will be created and the download should start automatically (if it doesn’t, the page has instructions for starting the download yourself). Save the archive (named something like SandboxLink-REL1_39-c4baec4.tar.gz) locally, and extract the files with the tar command on a Unix-like OS, or using 7-zip on Windows. The download screen gives the specific command to use.
After extracting the files, you should have a folder with the name of the extension (in this case SandboxLink) that contains the files for the extension. Move this folder into ../docker/mediawiki/extensions, so that ../docker/mediawiki/extensions/SandboxLink (or some other extension name) contains the files.
Then all you need to do is enable the extension, by adding:
wfLoadExtension( 'SandboxLink' );
To LocalSettings.php. Remember to also install composer dependencies and run the updating script if necessary.
MediaWiki Mail Handling
MediaWiki has multiple features that send out emails. One of them is that users can be emailed directly, without the user’s email being revealed to the sender (unless the recipient replies). Another is notifications when the pages that a user watches change. Password resets are also sent by email. However, the core MediaWiki software needs to be told how to connect to a mail server to send messages.
Thankfully, you don’t need to figure this out yourself, or even have such a server, to test it out! Instead, you can use the MailHog docker service to capture outgoing emails and save them for later. The emails are never actually delivered, but MediaWiki doesn’t know that. Create the file ../docker/mediawiki/docker-compose.override.yml with the content:
version: '3.7'
services:
  mail:
    image: mailhog/mailhog
    ports:
    # expose the HTTP service to the host
    - "8025:8025"
This tells docker that you want to add a new service, named "mail", using the mailhog/mailhog image (https://github.com/mailhog/MailHog) on port 8025. After reloading docker with the command:
docker compose up -d
The new service will be created and can be accessed at http://localhost:8025/.
Having created the mail handler, connect it to MediaWiki by adding the following to your LocalSettings.php:
$wgSMTP = [
    'host' => 'mail',
    'IDHost' => 'mail',
    'port' => '1025',
    'auth' => false,
];
To be clear, there are two different ports used, because MailHog creates two different servers. On port 1025 is the SMTP mail server that intercepts the emails, and on port 8025 is the HTTP server that lets you view them.
You can test the service out by navigating to Special:Preferences and setting your email address – a confirmation email will be intercepted by MailHog:

By clicking on the confirmation link, you "confirm" the email address, even though no message was ever actually sent to it.
Declaring the value of $wgSMTP is an example of configuring MediaWiki – changing settings to customize the software. This leads me to..
MediaWiki Configuration
MediaWiki comes with many configuration options, and extensions can add even more. These can be controlled by adding the settings to LocalSettings.php. A list of the core configuration options can be found on mediawiki.org.
A configuration option that is frequently used is changing the site’s logo. Recall that in the screenshot above, the logo in the top left was just the MediaWiki logo with the text "Set $wgLogos with the URL path to your own logo image" – this is exactly what we want to do!
$wgLogos = [
    '1x' => "$wgScriptPath/my-custom-logo.svg",
    'icon' => "$wgScriptPath/my-custom-logo.svg",
];
Reloading the wiki page will result in the new logo being shown, in my case:
Conclusion
Setting up a local MediaWiki instance to test against is not as complicated as it appears at first glance. A local wiki provides a chance to figure out if the MediaWiki software suits your needs, and if it mostly suits your needs, but a few things are missing, then extensions can provide those extra features. Currently, MediaWiki.org lists over 1500 extensions – and if the extension you are looking for isn’t available, WikiTeq can also create extensions for you!